Showing posts with label foodie resolution. Show all posts

Wednesday, February 16, 2011

Bye-bye Bacon Bonanza

Don't worry vegetarian and vegan friends, the vicious cycle of bacon is wrapping up. I just wanted to thank everyone who contributed ideas for my week of bacon exploration.

There were a lot of ideas so I couldn't make all of them. I also didn't want to make anything that incorporated another resolution type food (one I haven't had or didn't previous like). Only using familiar ingredients let me really explore the flavor of bacon. It was also a busy week so I admit I went for some recipes where I had all the ingredients and/or didn't need to expel a lot of energy toward. Perhaps I'll do this again sometime and explore bacon more. I still don't love it, but it certainly isn't bad!

In honor of all the ideas, I'm going to share all of them below. I will not use names unless, but please comment if you want to share details on any of the recipes you might have proffered. I'm sure others would love these just as much as I did.

Bacon wrapped dates.
Bacon wrapped dove breast.
Two eggs sunny side up with a bacon smiley face.
Two pieces of french toast with bacon in between.
Bacon stuffed mushrooms.
Classic BLT.
Bacon asparagus quiche.
Dip bacon in melted dark chocolate.
Roast a whole chicken with bacon layered on the outside.
Peanut butter bacon burger (my friend swore by this, but bacon or not... I'm skeptical of PB+burger)
Bacon wrapped jalepenos
Bacon Fried Rice
Peanunt bacon fudge
Peanut butter bacon cookies
Bacon cheddar grits
Brussel sprouts roasted with olive oil, salt & pepper, bacon chunks, a little bit of red onion
Bacon-wrapped chicken kebobs
Bacon in salads (especially with pear and blue cheese)
Bacon with mussels
Pig Candy (similar to my brown sugar variation of basic prep)

And if you are a foodie who can't take a joke or a vegetarian, for the love of god do NOT watch this suggestion my friend Stu sent me (along with 1/4 of this list):


Tuesday, February 15, 2011

Bacon Bonanza #3: The BBC (Bacon, Broccoli and Cheese)

Now for the final recipe in the bacon bonanza. This one was inspired by my friend Lauren who told me I should ad bacon to mac & cheese. I could also say that this was inspired by another friend, Michelle, who I made mac & cheese with a few weeks ago. She suggested we add extra cheese and broccoli, which seemed painfully obvious to me after hearing it but for some reason I've never really done.

Thus the BBC was born: Bacon, Broccoli and Cheese. I hate to admit I used a box for the mac & cheese, but if it is any consolation it was a Trader Joe's variety! I am pretty confident I will be exploring homemade mac & cheese recipes soon enough so I may very well replace this at some point. But if you're a fellow grad student, undergrad or simply breaking the glass to grab that emergency box of mac & cheese here's a good way to jazz up your cheesy cheap dinner.

This was by far my favorite bacon application. The added texture, saltiness and slight meat flavor of the bacon really added to the whole dish.

Bacon, Broccoli and Cheese
Prep Time: 30 minutes

Ingredients:
  • One box of your favorite macaroni and cheese/shells and cheese/whatever shape and cheese. (I used Trader Joe's Organic White Cheddar and Shells. I highly recommend finding an organic variety. They're not much pricier and I like to think the cheese is real or more real despite still being a powder.)
  • Milk (amount as specified by box... I really discourage using water if you want to a good creamy sauce)
  • Butter (amount as specified by box... this really adds to any box brand. Why oh why do they claim this is optional?)
  • 1 cup Cheddar cheese, grated. (I used a slightly sharp yellow cheddar, but you can pick what you'd like. I thought it was a good compliment to my white cheddar box flavor.)
  • 1-2 cups Broccoli, chopped into small florets. (I used one head so unless it's tiny or massive just use one head's worth).
  • 3-4 strips of Bacon, diced into bacon bits.
Directions:
  1. Follow recipe on box.
  2. After mixing in cheese mix, milk and butter, add additional cheese, broccoli and bacon.
  3. Cook on low heat and stir until cheese has melted and broccoli begins to tender.
  4. Enjoy!

Sunday, February 13, 2011

Bacon Bonanza #2: Bacon Between Bread

One of my favorite things in the whole world is a good grilled cheese sandwich with real cheese, whole wheat or fresh baked bread and tomato. In many grilled cheese recipes I have found online, seen on TV or at restaurants I have noticed bacon included in some fashion. At some point I will write about my the glorious concoction we all call grilled cheese, but this is not that post. This is about using bacon in grilled cheese.

As one note about my general philosophic approach to grilled cheese is that the cheese MUST be the star. You can't be loading up the deli meats or the bacon, add one slice of cheese, grill and call your sandwich a grilled cheese. THAT, my friends is a MELT not a GRILLED CHEESE.

So on to the bacon. I wanted to make two sandwiches. Both almost identical except for the cheese used. My logic was to combine the sweetness of from white Spanish onions, the saltiness bacon and the fruity acidity of tomato to really accentuate the deliciousness of cheese.

My roommate thinks I'm over thinking these things. What do you think?

For first sandwich I used a sharp Wisconsin yellow cheddar. I thought this would be a nice classic approach to a grilled cheese. It was a quality sandwich.

For the second sandwich I used one of my all time favorites: brie! This was an excellent choice because of how brie melts, but I think it has notes of both salty and sweet in its flavor. Paired with the onions, bacon and tomato all the flavors really combined to pack an incredible taste. This was also one of my favorite bacon application both for taste and texture... in all that creamy brie a little bit of a crisp bacon was nice.

TECHNICAL NOTE: Do not follow the pictures for the cheddar sandwich unless you are really skillfull at flipping a grilled cheese. I made a huge mess and did something different with the brie, that I think is better. I kept it open faced and after the cheese was melt I then pushed it together on my plate.

Grilled Cheddar Sandwich
Prep time: 15 minutes
Ingredients:
  • 1/2 tablespoon Vegetable oil
  • 1/4 cup white Spanish onion (or other sweet varieties), chopped finely
  • 2 strips Bacon, diced into bacon bits
  • Two slices bread (I used whole wheat. Use whatever you like, but a simple sliced white bread might not hold very well)
  • Butter, enough to spread on inner side each slice of bread
  • 1/4th lb Cheddar, sliced as thin as possible (this will make it easier to melt)
  • 2 thin slices Beefsteak tomato (or another large variety)
Directions:
  1. Heat vegetable oil in a frying pan. Add onion.
  2. Cook onion on medium heat until they start to become transparent, about five minutes.
  3. Add bacon and cook until warm.

  4. Place bread side by side in a large frying pan or skillet.
  5. Layer cheese on both slices of bread. On one side layer tomato slice to cover the length of bread. On the other spread mixture of onion and bacon.
  6. Cook on low to medium heat until cheese begins to melt.
  7. Bring slices together. I recommend keeping the one with the onion/bacon mix as the bottom (imagine flipping that mess over!).
Grilled Brie Sandwich
Prep time: 15 minutes
Ingredients:
  • 1/2 tablespoon Vegetable oil
  • 1/4 cup white Spanish onion (or other sweet varieties), chopped finely
  • 2 strips Bacon, diced into bacon bits
  • Two slices bread (I used whole wheat. Use whatever you like, but a simple sliced white bread might not hold very well)
  • Butter, enough to spread on inner side each slice of bread
  • 1/3rd lb Brie, as much rind removed and sliced as thin as possible (this will make it easier to melt)
  • 2 thin slices Beefsteak tomato (or another large variety)
Directions:
  1. Heat vegetable oil in a frying pan. Add onion.
  2. Cook onion on medium heat until they start to become transparent, about five minutes.
  3. Add bacon and cook until warm.
  4. Place bread side by side in a large frying pan or skillet.
  5. Layer cheese on both slices of bread. On one side layer tomato slice to cover the length of bread. On the other spread mixture of onion and bacon.

  6. Cook on low to medium heat until cheese begins to melt.
  7. Bring slices together. I recommend keeping the one with the onion/bacon mix as the bottom (imagine flipping that mess over!). I also recommend doing this on a piece of foil or a paper towel over a plate. While eating the brie will ooze out so being able to wrap it might be nice!

Saturday, February 12, 2011

Bacon Bonanza #1: The Bacon Basics


Don't worry, I didn't JUST make the bacon so no food poisoning or rotten meat here. Just a case of the lazy blogger. This will be the first of a 30 days blogging blitz. In effort to make blogging a habit I'm going to post something everyday until March 16th. Ready? Set? Eat!

Last time on the blog I was trying to figure out what to do with 12 strips of bacon. After consulting with many friends and summoning the wise oracle of Google I settled on baking them. Some friends urged me to fry them, but others assured me baking was a good idea and many blogs from both experts and fellow amateurs said baking was the best way to get quality bacon without lots of mess or energy.

I ate two strips plain just for the sake of tasting and then two the only way a grown man can properly enjoy his bacon served plain: with eggs forming eyes and the bacon forming a smile for a smiley face breakfast!

At least one friend and one blog also suggested baking the bacon with brown sugar on it. I have to say out of this first bacon-y morning this was my favorite thing. The combination of the sweet and meaty saltiness was actually good. Everything else was only ok. I can see why people love bacon, but I'm still not converted.

Basic Bacon Prep
Prep Time: 11 minutes | Servings: Based on the package/your bacon capacity

Ingredients:
  • Bacon
  • Yeh, that's really about it for this one.
Brown sugar variation:
  • 1 tablespoon Brown sugar per bacon strip. (I highly suggest dark brown)

Directions:
  1. Preheat oven to 400 degrees.
  2. Line a cookie/baking sheet with foil. I recommend using one that has at least some depth (the fat will render out).
  3. Lay bacon strips flat without them touching each other.
  4. Bake in middle rack for 6 minutes
  5. Using tongs or a spatula flip bacon over.
  6. For brown sugar variation: Sprinkle tablespoon of brown sugar on each strip desired
  7. Return to oven for another 5 minutes
  8. Let cool on paper towel (to soak up excess fat. As it cools it will continue to crisp.)

Monday, January 31, 2011

Bacon: The Final Frontier! (Sorry Mom)

I want to apologize to the dozen or so of you that have been following my blog. School started and I became both busy and lazy, but I assure you that I have a January Monthly Muffin coming soon. If it's any consolation this entry is going to be a good one!

Bacon! Every non-vegetarian, non-religious Jew I know seems to be obsessed with it. What is it with cured, salty meat? I wish I could tell you. I grew up in a traditional Jewish home. We weren't strict about kashrut (or keeping kosher for you goys), but we ate what many call "kosher style". "Kosher style" is a practice many reform, conservative or traditional Jews adopt where you don't stress about getting certified kosher meat or separating your kitchen, but you also don't eat non-kosher meat such as pork or mix dairy with meat.

Because of this "kosher style" upbringing, I never really gained a taste for Porky the Pig. Yes, I have had bacon and other pork products, but as you may have read my resolution is to try or re-try such foods. As part of this quest I have bought some....

So according to the package I have 6 servings of 2 pieces of bacon each. So dear blog readers, I need your help! How should I prepare my bacon? I am happy to grab one or two simple and cheap ingredients, but otherwise want to use what I have around here. So far I think I'm going to make the following dishes:
  1. Just some simple fried bacon. You science types can call this a control.
  2. A grilled brie, caramelized onion and tomato with bacon sandwich
  3. A grilled cheddar, caramelized onion and tomato with bacon sandwich
  4. Some sort of bacon and egg traditional breakfast
  5. ?
  6. ?
Looking forward to hearing your ideas. I'll obviously be posting once or twice with the results.

P.S. If any of my readers happen to be vegetarian, I'm probably going to do tofu next month so I'll be looking for ideas then!

Friday, January 14, 2011

Resolution Item 1: Brussel Sprouts

As I shared in a previous post, I am going to try (0r retry) two foods every month this year. First up is brussel sprouts! Why? Well to be honest my friend Alexis offered to prepare some for me and then I found a whole stalk at the store and thought it looked really cool:

Aside from my friend using previously frozen sprouts sauted in olive oil with garlic salt. My reaction that they tasted like a veggie version of meatballs with a bit of mushiness. I wanted to try myself and added two more simple recipes.

Roasted Brussel Sprouts

Prep Time: ~25 minutes | Serves: 3

Ingredients:
  • 1/2 pound Brussel sprouts, halved rinsed and drained
  • 1 tablespoon Olive oil
  • 2 cloves Garlic, minced
  • 1/2 teaspoon Paprika
  • Salt, to taste
  • Ground black pepper, to taste
Directions:
  1. Preheat oven at 450 degrees.
  2. In a pan toss sprouts with olive oil and spices until coated evenly.
  3. Bake for 20 minutes or until lightly browned and tender. Stir about halfway through.
___________________________________________________________

Brussel Sprouts in Lemon Butter Sauce

Prep Time: 10 minutes | Serves: 3

Ingredients:
  • 1/2 lb Brussel sprots
  • 2 tablespoons unsalted Butter
  • 2 cloves Garlic, minced
  • 1/2 teaspoon Paprika
  • 1/2 teaspoon dried Oregano
  • Juice of half a Lemon
  • Salt, to taste
  • Ground black pepper, to taste
Directions:
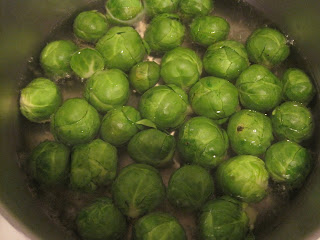
  1. Bring an inch of water to boil in a pot.
  2. Add Brussel sprouts to water and return to boil, then reduce to low heat.
  3. Simmer for 8 minutes.
  4. In a medium to large skillet melt butter, then add garlic.
  5. When garlic begins to brown (about 60 seconds) add remaining ingredients. Bring to boil.
  6. Reduce heat to low and transfer drained brussel sprouts.
  7. Toss to coat in butter sauce.

My conclusion: I still don't love brussel sprouts, all three recipes came out a little two bitter and mushy for me, but I would be happy to prepare or eat them again if necessary. Happy to hear tips on how to overcome the texture or bitterness problem if I'm doing something wrong!